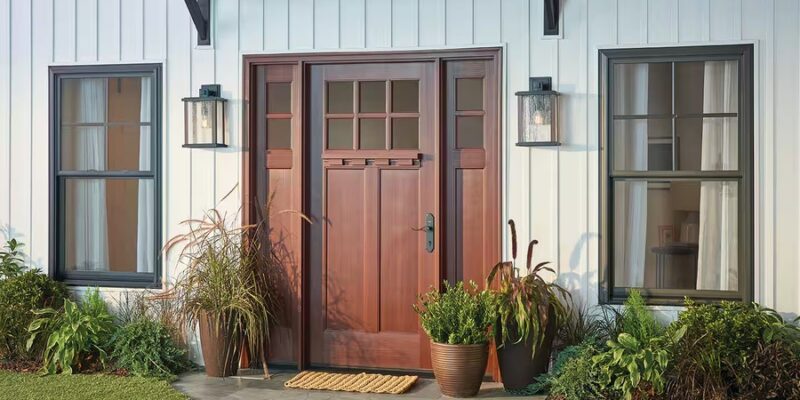
Installing a new house door with a side panel (haustür mit seitenteil) can dramatically boost your home’s curb appeal, enhance security, and improve energy efficiency. Whether you’re upgrading an outdated entryway or replacing a damaged door, this DIY project is achievable with the right tools, materials, and guidance. A prehung door with sidelight—essentially a door unit that comes factory-assembled with a frame and adjacent glass panel—saves time compared to building from scratch. In this comprehensive step-by-step DIY guide, we’ll walk you through the process, from preparation to finishing touches. Expect the project to take 4-6 hours for a beginner, and costs to range from $300-$800 depending on materials.
This guide is optimized for homeowners tackling exterior door installations, focusing on wood or fiberglass options with a single sidelight. Always prioritize safety and local building codes—consult a professional if you’re unsure about structural elements.
Why Choose a House Door with Side Panel?
A haustür mit seitenteil, often called a sidelight door, combines functionality with style. The sidelight allows natural light to flood your entryway without compromising privacy, making it ideal for front doors. Benefits include:
- Increased Natural Light: Sidelights brighten dim foyers, creating a welcoming atmosphere.
- Enhanced Aesthetics: Options like stained glass or frosted panels add architectural flair.
- Better Security: Modern sidelights use tempered glass and reinforced frames.
- Energy Efficiency: Paired with weatherstripping, they reduce drafts and lower utility bills.
According to home improvement experts at This Old House, sidelight doors can increase home value by up to 5% in curb-appeal-focused markets. If you’re searching for “how to install exterior door with sidelight,” this guide has you covered.
Tools and Materials Needed for Installation
Before diving in, gather these essentials to ensure a smooth house door installation. Stock up at your local hardware store like Home Depot or Lowe’s.
Essential Tools:
- Tape measure and level (4-foot recommended)
- Hammer, pry bar, and reciprocating saw
- Drill with bits (including 1/8-inch pilot and countersink)
- Screwdriver set and utility knife
- Shims (wooden wedges) and mallet
- Caulk gun and safety gear (gloves, goggles, dust mask)
Key Materials:
- Prehung door unit with sidelight (measure your rough opening: typically 36×80 inches for standard doors, plus 12-18 inches for the panel)
- Galvanized nails (2- and 3-inch) or deck screws
- Exterior-grade caulk, low-expansion foam insulation
- Flashing tape and drip cap
- Weatherstripping and threshold seal
Pro tip: Double-check your door’s swing direction (inswing or outswing) and handing (left or right) when purchasing.
Preparing for Door Installation: Measuring and Removing the Old Door
Proper preparation prevents costly mistakes. Start by assessing your space.
Step 1: Measure the Rough Opening
Remove any trim around the existing door using a pry bar. Measure the rough opening height, width, and diagonal (for squareness). The new door should fit snugly—aim for 1/2-inch clearance on all sides. For a door with side panel, ensure the combined width accounts for the sidelight frame (e.g., 48-60 inches total).
If your opening is off by more than 1 inch, you may need to adjust framing—call a carpenter.
Step 2: Remove the Old Door
Unscrew hinges with a drill, then lift the door out. Use a reciprocating saw to cut through nails securing the frame. Gently pry the jambs free, working from the interior to avoid exterior damage. Dispose of debris responsibly.
Safety note: Brace the door to prevent it from falling. This step alone can save hours of frustration during your DIY house door installation.
Step-by-Step Installation Process
Now, the heart of the project: hanging your new door with side panel. Work from the exterior for better visibility.
Step 3: Test-Fit the New Door Unit
Position the prehung unit in the opening, with the exterior side facing out. Insert shims under the threshold to level it—use your 4-foot level to check. The reveal (gap between frame and door) should be even, about 1/8 inch.
For the sidelight, ensure the panel aligns flush with the exterior siding. If it binds, trim shims accordingly.
Step 4: Secure the Hinge Side
Prop the unit plumb using shims at hinge locations (top, middle, bottom). Drive 3-inch galvanized nails or 3-inch deck screws through the frame into the king stud—avoid overdriving to prevent warping. Check plumb every few fasteners.
Step 5: Shim and Secure the Latch Side and Sidelight
Shim the latch side and sidelight frame for square. Nail or screw every 12 inches, starting at corners. For the sidelight, secure mullion (the vertical post between door and panel) first, then the header and sill.
Test the door swing: It should close without resistance. Adjust shims as needed.
Step 6: Insulate and Seal
Fill gaps with low-expansion foam (it expands to seal without bowing the frame). Trim excess once cured. Apply flashing tape over the header and sill for water resistance. Install the drip cap above the unit.
Finishing Touches: Trimming, Caulking, and Weatherproofing
A flawless finish elevates your installation from good to professional.
Step 7: Install Trim and Threshold
Nail or screw exterior brickmold or casing around the frame, mitering corners for a clean look. On the interior, add jamb extensions if needed. Seal the threshold with weatherstripping and caulk all exterior seams with silicone.
Step 8: Hardware and Final Checks
Hang the doorknob, deadbolt, and any decorative pulls. Lubricate hinges. Walk through weatherproofing: Spray water on the exterior to test for leaks.
Common Mistakes to Avoid in Door with Side Panel Installation
Even seasoned DIYers slip up. Here’s what to watch:
| Mistake | Consequence | Fix |
| Skipping Level Checks | Uneven door, poor seal | Re-shim and re-level frequently |
| Over-Tightening Fasteners | Warped frame | Use pilot holes; hand-tighten screws |
| Ignoring Sidelight Alignment | Gaps or stress cracks | Measure mullion plumb before securing |
| Poor Caulking | Water intrusion | Use backer rod for deep gaps |
By avoiding these, your house door with side panel will last decades.
Maintenance Tips for Longevity
Post-installation care keeps your door looking sharp. Clean sidelight glass with vinegar solution monthly. Re-caulk annually and inspect weatherstripping for wear. In humid climates, apply a wood preservative to prevent rot.
When to Call a Professional
If your opening requires framing adjustments, electrical work for lighting, or you’re dealing with a historic home, hire a pro. Costs for professional installation run $500-$1,200, but it’s worth it for peace of mind.
Conclusion: Transform Your Entryway Today
Installing a house door with side panel is a rewarding DIY project that yields immediate results. Follow this guide, and you’ll have a secure, stylish entry in an afternoon. Ready to start? Head to your local supplier, grab your tools, and enjoy the glow-up. For more home improvement tips, like “best exterior doors 2025” or “sidelight repair,” bookmark us. Happy building!